Last week we went
off in our groups to find a location and film a test shoot for our opening
sequence. We found a really good location for the tent section of our opening
sequence in the woods. We didn’t have any of our props (tent) which is
obviously a vital part to the scene but I feel as though we worked well with
what we had.
We had to shoot
the whole thing on my iPhone so obviously the camera work was shaky and it wasn’t
nearly as good quality as we hope the final product to be. We focused it on the
shot types and came up with loads of different ideas as to how we could
manipulate our surroundings to our benefit and take advantage of everything
around us.
Despite our
efforts, the footage we did have didn’t turn out too great as a lot of the good
shots got lost on my phone because it ran out of storage which was very
frustrating, so we decided to try again in a different location. We then focused
on the bath scene at the beginning and end of the opening sequence and to do
this we went up and used the bath in Hurtwood House. This was not a very
accurate representation of what we would hope for the bathroom to look like in
the real thing. This went well however it wasn’t exactly what we would hope it
would turn out to be, but it is only a test shoot and it gave us an accurate
idea as to how we would film it and the sort of angles we are looking for so it
was helpful in that respect.
Last Friday as
groups we had to pitch our initial idea to Mike to get a second opinion on our
idea and it allows us to get an even more accurate idea of what will be
possible within our idea. Hearing the feedback Mike gave to other groups before
ours was also helpful in regards to our own ideas and I feel being able to hear
the other group’s ideas was also helpful and it is interesting to hear what the
other groups are doing. We described the basic outline of the opening sequence,
beginning with the woman in the bath scene and then describing the tent
flashback scene and eventually coming back to the woman in the bath scene.
Throughout the description Mike listened and then when we were done, without
including any of the technical aspects, we got out feedback from Mike. What he
told us was extremely helpful and he gave us ideas too. He mentioned that we
have combined two different ideas in a way that makes it much too complex and we
need to pick one of these ideas. This we knew would be difficult as both of the
ideas were really good and we all really liked both of them.
Despite this, we
further developed our idea and came up with an idea. To begin with, the woman
will be in the bath in her clothes and as the camera focuses on her face, you
can hear faint screams in the background which appear to be coming from the
inside of her mind. As she goes under the water she will lie there for a while.
She will then try to get her head outside of the water (at this point the
camera will be focused on her face) and as she attempts to get up, the camera
zooms out where there is a hand on her throat and she begins to panic and
scream and at one point the camera will be under the water looking up at a
blurry figure which appears to look like the protagonist herself. At this point
I think it will be fun to play around with sound as we could do muffled scream coming from the protagonist
and it will be interesting to get the sound right. The woman then bursts out of
the water and begins to pant, she looks around the room and it becomes apparent
that there is no one else in the bathroom. She is completely alone.
The full storyline
is that the woman is schizophrenic and keeps having visions of being murdered
by herself. This is due to the immense guilt she feels from killing her friend
on a camping trip, however she is so in denial about this that she has blanked
out any memory of what happened that night.
Over the next few
days we will be pitching our ideas to a different media teacher to get another
view and more suggestions on how we could improve it. We will also be told the
sort of things that will work and the sort of things that won’t, which will be
extremely helpful in the making of the video. The next few weeks will be
focused on perfecting the idea and gaining a complete understanding of what it
is we want.
We are soon going
to make a mood board to get an idea of the tone of our thriller and I think this
is where everyone’s different ideas will come together and we will be able to
agree on an overall tone of all the aspects within the thriller. I look forward
to creating this video and I am enjoying the lead up to making it.
My inspiration originally came from tv shows like American Horror Story, however I am unsure if this kind of approach is going to fit with our new idea, I mainly focused on the music rather than the visual aspects.
I have been put in
a group with Georgia and Jemma. I am happy with this group because I
feel as if Georgia and I have very similar views on what we want the thriller
to be like and I really liked her original idea with the woman in the bath in
her clothes so we made the decision to incorporate our ideas and I am very
confident in our new thriller idea. We also incorporated Jemma’s idea of
someone going missing at the end and Jemma has been helpful throughout
planning. Sofia is away at the moment but I am confident that when she gets
back her input will be most helpful towards our making of this video. We
have been developing our idea throughout lessons and have made a storyboard to
get an idea of what we want it to be like and the type of shot types we would
be looking for.
At the moment during lessons we have been filming test shoots in an attempt to get an idea of what the sort of tone of the thriller will be like. We didn't film much as our thriller doesn't seem to work much without the use of props (tent) and the manipulation of lighting is crucial for adding suspense in our sequence, and we were unable to do this as it had to be done during the lesson where it was daytime so it was light outside and we didn't have the means to manipulate the lighting (like a good enough camera). We filmed these test shoots on my iPhone and it was really rough just to get an idea of how we are going to film it and the sort of locations we are looking for.
I feel as though sometimes our group can have disagreements on what we want because some of u have different interpretations of what the thriller is going to be like to others but I feel that once we begin to create mood boards and we all get a really clear idea of what we are doing the ideas will all merge and fall into place and everyone will be happy with the outcome.
Throughout the
other student’s presentations we were given a sheet in order to give both
positive and negative feedback about what we liked/ disliked. I feel this was a
really good way of getting to understand the idea fully and it meant you were
able to suggest how you could possible incorporate these ideas with your own if
you were to be put in a group together. Despite this being helpful, I found it
very difficult to come up with an “even better if…” idea because everyone had obviously
thought their ideas through thoroughly and had a solid plan of what they
wanted, and I found with a lot of people’s I liked them as they were and
altering their idea in any way would have made it worse rather than improving it.
My Original Idea for the Opening Sequence of a Thriller
“Zip” would be the name of it.
It would begin
with an establishing shot of a tent in the woods, and a light would be on in
the tent so you are able to see a silhouette of the two girls inside the tent.
There would be creepy old fashioned music playing and the camera would zoom in
on the zip as the music plays. When it gets close to the zip it would cut to
inside the tent where the two girls who would be sitting talking and listening
to music with headphones. There would be pan shots around the tent to show small
things and just generally set the scene. The girls would then look up and see a
figure walk past their tent so they would pause their music and zip open the
tent in order to look outside, as she zips open the tent, the camera would
follow the zip up and then cut to a pan of outside the tent where they would
see no one. They then go back to talking and listening to music and again,
think they see someone, look outside, no one there. This then happens a third
time but as they see the figure it appears they are walking towards them, so
she quickly opens up the zip as the camera follows yet again, and as she looks
out the tent the shot is of a close up of one of the girl’s faces so you are
able to see their expression change as the other girl rushes inside the tent
behind her. The main girl then crawls back into her tent, zips it up and joins
her friend in sitting at the back with her knees into her chest, rocking. At this
point there is a shot of both their legs and feet rocking back and forth. There
is then a shot of the zip at the bottom of the tent as it shakes around a bit,
and then begins to slowly open while in the background you can hear the girls
panting and making generally terrified noises. As the zip gets to the top of
the tent, the camera stays on there as you hear the beginning of a scream, but
it is soon cut out as the light turns out and it is pitch black for a few
seconds before you hear the noise of the tent being zipped up again and there
is then a close up shot of the zip as the light turns back on and the creepy
old fashioned music begins to play again and the camera zooms out but this time
there is only one silhouette of a person and they are looking around their tent
and in the background you can hear them shouting their friends name and panting.
The audience are left not knowing which of the girls died, how they died, or
where their body went. Zip is an image of safety, shows the fine line between
life and death, realism and surrealism.
Main Storyline
Everyone believes
the girl left alive was the killer of her friend, but she wasn’t, so while she
is being interrogated by the police daily, she is also being haunted by this
silhouette we saw in the beginning and sees it everywhere so slowly throughout
the movie she becomes more and more insane and ends up succumbing to the
‘silhouette’ and goes back into the woods where her friend disappeared and is killed my the same thing that killed her friend.
This is the sort of silhouette I would be looking for in the opening establishing shot and the ending shot.
The first film I am going to analyse is the
film Almost Famous, in the second scene of the movie. As Anita, played by Zooey
Deschanel attempts to sneak in through the door, as the audience you are able to
hear the diegetic sound of church bells ringing, this is so that the audience
almost subconsciously relates the characters to religion. When the camera is on
Anita outside, the audience are still able to hear the mother and the boy
talking about the presidents of the United States. There is then the diegetic
and pleonastic sound of Anita testing her breath, it is pleonastic for the
audience to notice it and wonder why she has to test her breath just to talk to
her family. Meanwhile the church bells are still ringing. Anita then goes up to
the door and there is a diegetic sound of her saying “Please, please, please,
please”, this causes the audience to believe Anita is trying to avoid her
mother. As she turns the door knob, there is a diegetic and pleonastic sound of
something falling off the door knob, to give the impression that someone had
put it there on purpose so that they could hear when Anita came home. The
mother then turns round and the diegetic sound of her voice saying “Anita?” is
present within the scene. Anita then replies “Hey mom”, which is also diegetic.
While the two characters are talking, the diegetic sound of birds tweeting is
still playing in the background. Anita then enters the house as the diegetic
sound of the door shutting happens in the background.
The second film I am going to analyse is
the film Jaws. This clip begins with somebody talking to the chief (played by
Roy Scheider) about some “problems at the house” this speech is diegetic but is
soon overpowered by the scream of a girl in the water, this scream is
pleonastic as well as diegetic. Straight after this, the chief’s wife begins to
talk, saying “Honey, honey would you come here for a minute please.” These
diegetic sounds are used to create an atmosphere of distraction around the
chief because what he is really looking out for is another shark attack. As the
chief and his wife talk, which is diegetic sound, the main focus of the sound
switches from their conversation to the conversation of the boys in the
background. This is to highlight the fact they are going to go swimming. The
camera then cuts to a scene of all the boys in the water and the sound of them
swimming is pleonastic as the water crashes around them, this use of pleonastic
sound is done intentionally to scare the audience and make them feel on edge
about what is about to occur.
More distractions of speech occur around
chief Brody as he desperately tries to focus on the people in the water to keep
an eye out for them. The scene then cuts to the children in the water and you
hear pleonastic sounds of screaming and splashing, this is used to create a
hectic scene for the audience, as if there is so much going on how could the
chief possibly concentrate on all of the children at the same time. As a boy is
searching for his dog, calling its name (diegetic sound) a little boy is
singing “The Muffin Man” it could be argued that this is contrapuntal sound as
the boy has lost his dog and it is becoming apparent that something bad has
happened to the dog. The scene is then underwater and the famous Jaws music is
being played as the camera pans around at children’s legs. This music is
non-diegetic, creating mystery about where it came from and why it is there.
The music speeds up as it gets closer to a boy’s legs and then it stops
entirely. This is so that what just happened has an impact on the audience and
it is all they are allowed to focus on. People begin to notice and the diegetic
sound of speech is used. Children still play in the water, however the diegetic
sound of their splashes is suppressed by the sound of the little boy being
tumbled around in the water. There is then pleonastic and diegetic sounds of
the boy’s muffled screams for help as he gets dragged under the water.
An establishing shot is usually the first shot of a scene,
designed to show the audience where the scene is taking place.
Extreme
long shot
An extreme long shot is used to set the scene in a more
detailed way than in that of an establishing shot.
Long
Shot
A long shot is usually used to show the body language of
characters. While the main focus is on the characters, elements of the
background are still prominent.
Mid-Long Shot
A mid-long shot
usually shows the character from the thighs to the top of the head and is
normally used for dialogue scenes.
Mid
Shot
This is used for more detail of a mid-long shot.
Close Up
Used to show more detail and show the character’s facial
expressions.
Extreme Close Up
The shot is so
tight only a person’s eyes, for example, can be seen. Usually used to create an
intense atmosphere.
Thrillers heavily stimulate the
viewer’s moods, giving them a high level of anticipation, heightened expectation,
uncertainty, surprise, anxiety and terror.
Action
Thriller: This is more common in movies than in novels because of the
visual appeal of explosions and violence. An example of this kind of thriller
would be The Dark Knight.
Crime
Thriller: This sub-genre focuses on crime and is usually from the
criminal’s perspective. Physical action and eluding the police take the place
of gathering evidence and trying to discover the criminal. An example of this
type of thriller would be The Usual Suspects.
Psychological
Thriller: In this sub-genre a lot of the conflict is mental rather than
physical. The protagonist has become involved in a dangerous situation which
literally threatens their sanity. They use mental prowess to overcome their
opponent, whether the battle is inside their own head or it is a battle of
wits. An example of a psychological thriller would be Shutter Island.
Medical
Thriller: A medical thriller involves something usually used for
medical purposes becoming a deadly weapon. Often this is some sort of virus
leaking out into the public. An example of this kind of thriller would be
Contagion.
Romantic
Thriller: In a typical romantic thriller, the plot line follows a
thriller’s tension, suspense and excitement. But the main element of the movie
is the growing relationship between two characters. Ex Machina is an example of
a romantic thriller.
Supernatural
Thriller: In this sub-genre otherworldly elements are introduced,
usually as an antagonistic force, but just as in a romantic thriller, the plot
line and feel are distinctly that of thrillers. Some characters may have
psychic abilities. A well-known supernatural thriller is Paranormal Activity.
Mystery
Thriller: A mystery thriller differs from a mystery by being much more
fast paced, with the protagonist on the run and the threat of another crime
serving as the “ticking clock”. Psycho is a mystery thriller movie.
Two weeks ago we went into groups of four as a class and shot
the preliminary task. We were given a script to follow and were left to our own
devices to create the video. Last week we spent the lesson editing the shots together
to create a video.
We began with a wide shot in order for the audience to
establish the scene and get an idea of the kind of space the characters were
in. We then cut to a close-up of character “A” as she says “You’ve got to do it
before they come” which displays an example of diegetic sound. We cut to this
close-up shot to give the audience more detail of the characters and it also
helps to intensify the scene.
After a second close-up of character “B” we cut to an
extreme close-up of character A’s eyes, this was also used to intensify the
scene and helps the audience notice small details about the characters, and
brings across a sense of the emotion the characters are feeling.
After the audience establish the small details of the
characters and get a sense of the intensity and emotions shown through these
small details, we cut to a mid-shot of character A walking out and pausing with
her hand on the door and as she just started to pull the handle we cut to an
extreme close-up of the door handle opening and left the camera hovering over
the scene in order to let the audience watch character A walk away and the door
handle close. The sound of the door closing, which I feel would have worked well if we had exaggerated it to make it pleonastic, gave the scene a sense of closure.
To add to this sense of closure we cut to an extreme
close-up of character B looking out at where character A had just left. We did
this to encourage the audience even further towards the idea that character B
was left alone in the room and were thinking through their decisions. When filming this extreme close up, character A was actually still walking out the door so we decided to get rid of the sound in this clip as you could hear the door shutting. Despite this being a good idea, it means that the end of the clip is entirely silent meaning it makes the audience feel slightly disorientated and gives a sense of the scene being other-worldly as in our world, there is always background noise. If we had more time I would have added in some background noise on the end shot of the close-up.
If I were to redo this task I would probably have chosen not
to be character B as I’m not a actress and I feel as if I could have
contributed a lot more if I were behind the camera or directing the camera. The
director of our group did not really push us as a group in the right direction
so the person on the camera was left to sort everything for themselves which
was unfair I believe.
I also think I would have made it more interesting and put a
twist on it like either made it humorous or gone all out serious because I feel
as though the mood of the sequence is trying to be very intense but is actually
relatively relaxed.
Furthermore, we could have perfected the shots more as some
of the shots we began in one place, realised it was the wrong place for this
type of shot, and decided to pan the camera across so that it was in the right
place. However I feel it would have been much cleaner if we had set up the
camera in the correct place to begin with, and it would mean editing the shots together a lot easier. We should have had someone in particularly looking out for continuity as instead we were all looking out for it while trying to focus on our own personal tasks. This lack of a lookout meant that when going back through the videos we spotted a few continuity errors that should have been prevented.
Last lesson we
were in the studio learning how to film a sequence. Matt talked us through
everything and told us what we had to do and how to do it and then we were
split into groups and were told to film a specific task which was given to us
on a piece of paper.
As a group of
four we were working with the editing suite as our set, using the Sony FS100. We
assigned ourselves different roles within the set, we had a camera man, a
director and two actors. We began with filming the wide shot as this is the
first on the scene and once we have this shot established and done so that we
are happy with it, it means we can then get on to the more interesting shots
and move the camera around a lot more for close ups etc. We filmed the entire
sequence with this one shot to make it easier when it comes to editing. The
scene involved two characters, “A” and “B”. I played character B and although
it was a simple script, we attempted to make it more dramatic by using
different camera angles.
The second shot
we filmed was a behind the shoulder shot. We first did this behind my shoulder,
looking at Sofia or character “B”. When filing this we filmed the whole script
through from beginning to end so that when it came to editing it means we can
cut and edit the clip to what we want, it makes the footage easier to
manipulate. We then did the same over the shoulder shot but this time it was
over Sofia’s shoulder, looking at me. Again we filmed the entire sequence using
this one angle.
After doing
those shots so that we were happy with them, we moved on to close ups. The
first close up we did was of my face as I spoke. This shot was used to help the
audience establish the kind of emotions they should be feeling and the kind of
emotions the character is feeling. We then did the same close up of Sofia,
again going through the whole sequence again.
We then, after
establishing these essential shots, decided to play around and see what else we
could do. We decided to film a shot of Sofia walking out through the door to
add to the dramatic effect of her last line. We then filmed a shot of the door
handle from beginning to end when she first opened the door, to when her hand
lingered on the handle before she stormed out.
We attempted to
make Sofia look like she was the powerful one in the scene. To do this we put
the camera up high and I looked up at it. This was an attempt to make me look
small and weak, vulnerable even. Despite our efforts, the shot just wasn’t
quite working in the way we wanted it to so we gave up. It would have worked if
we had filmed all of the shots at this same angle, however we didn’t have time
to redo the shots and decided to work with what we had already.
Last lesson we were learning about how to edit together
the videos we had made the week before. We were using a programme called Adobe
Premiere Pro to help us do this. We were given a quick tutorial to begin with
on how the programme works and general terminology we need to know in order to
work the programme efficiently.
We began by getting into pairs or groups of three
and watching the videos from last week so that we could get to know our
footage. These clips are kept in folders called bins.This was so that when it
came to putting it all together we were aware of the kind of shots we had and
could easily and quickly manipulate the footage. We then saved copies of the
footage we think we might want to use so that we don’t mess up the original
data if we decide to change something.
After watching the clips a few times we learnt how
to cut them to the footage that we wanted. To do this you click where you want
the clip to start from and press CTRL+I for IN, and to cut the clip so it stops
where you want it to stop you press CTRL+O for OUT. We then drag this clip onto
the video timeline where we can put in more clips and create a whole video. You
must always put the clip you wish to be played on top of the previous clip as
the programme will always play the highest clip.
We repeated this step with all of our chosen clips
until we had made a full scene that we were happy with. We had one issue with
our clips which was that one of our extreme close up shots was very short and
so when we cut from a mid-shot to the extreme close up it didn’t quite look
right.
This lesson was so helpful as this is the programme
we will be using throughout the year so to get a basic understanding so soon is
very helpful and means we can get to grips with the more detailed stuff later
on without having to learn about the basics as well as that.
Last lesson
we went into the studio to learn more about the cameras and how to use them.
180 Degree Rule
The first aspect we looked at was
the 180 degree rule. This aspect is essential when shooting as if you disobey
this rule it can disorientate the audience. The idea is that when filming
something, for example a conversation, you cannot cross the line that goes
between the two characters. This means you will always been filming from the
same side, but you can adjust to different angles when switching between who is
speaking. At first I thought this rule would limit the amount of different
angles you are able to get however it actually has a wide range of different
angles you are able to use. This was demonstrated on a toy motorbike, as if
filming some sort of chase and it clearly showed how to get plenty of different
perspectives just by following this rule.
Filming A Sequence
We were then taught how to film a
sequence in groups. To do this there had to be a director, a camera operator, a
continuity person, and someone on lookout for anything that looks out of place
or wrong (assistant director). I acted as the director and looked out for
continuity errors also, all of us did as this is an essential part of a movie
and a commonly made error. Continuity is essential as, if you do not look out
for continuity, when you put the scenes together some things will look out of
place if not everything is kept the same between shots.
After establishing these roles, we
learnt about the important terminology you must use. For example the director
must say to the camera operator:
Director: “standby”
Camera Operator: “standing by”
meaning they are ready to begin filming.
Director: “role camera”
Camera Operator: presses button to
start recording, “rolling”
Director: “action”
This is when the actor/actress will
walk on set and begin the scene.
Director: “cut”
This means the camera operator will
stop recording and they can adjust something that didn’t look right, or move on
to another scene.
We then went off in our groups to
work with the different cameras. Our group was working with the Canon 5D. We
decided to do a scene of Francesca taking off her watch and placing it on the
table. We began with a wide shot to establish the environment she was in and
just generally set the scene. We then moved on to a mid-shot of her
taking off the watch where you could still see her surroundings, but the main
focus was of her taking off the watch. Finally we moved on to close up shots
where we shot one of her hands while taking off the watch to add a sense of
drama to the very normal action. After this we did a close up of the watch
being placed on the table and then kept the camera on the watch for a bit
longer to add dramatic effect again. We then attempted to do a close up of her
face as she took off the watch however we realised throughout the scene
Francesca had her hair covering her face so you could not see her expression,
due to this we decided to abandon this idea.
If we had more time I would have
liked to have done a shot from above, looking down on her taking off the watch,
and one from below looking up, as we tended to stay at the same sort of height
throughout.
Last Thursday we had
a lesson in the studio to get an introduction about the cameras and how to
approach some of the equipment when in the studio or in a filming situation.
The first thing we did was split into groups and set up a tripod, which was a
lot simpler than it looked at first, we then got to experiment with the height
of it which gave me a clear idea of the kind of angles you are able to create
with the tripods alone. After this, we looked at three different types of
cameras, the Sony NX5, Sony FS100 and a Canon 5D.
After looking at these cameras (when they were in
their boxes) we got them out in our groups and set them up on the tripods. To
set them up on the tripod you have to hold down a button on the side and slide
the camera in the tracks. Once the cameras were fully set up and stable, we
then got to play around with the different features on the cameras and just
generally get to know how they work.
Each group
got a go on the different cameras in turn and we got to know which cameras
would be best suited for which type of video and which cameras we preferred to
work with. For example my favourite is the Sony NX5 because I find it very easy
to use. However when taking this camera off the tripod you have to be careful
not to bash the lens on the tripod as this camera is top heavy. My least
favourite to work with is the Canon 5D because it is a little different to the
other cameras and more difficult to use (in my opinion).
We were also taught how to make sure the camera
is straight. To do this you have to hold the camera at the top and manoeuvre it
around from the bolt at the bottom until the small air bubble to the side of the
camera is in the centre of the yellow circle surrounding it. After trying this
out on the camera a few times, we moved on to how to put a battery in. This is
very easy, you simply push the battery in, and slide it either up, down, left
or right (it differs on certain cameras) and it should click into place.
When filming, the shot must be in focus to stop
it from looking strange or abnormal. To make sure the camera is in focus you
must zoom in as far as you can and focus the lens, then zoom back out so it is
focused on every aspect. We were also taught how to white balance a camera.
White balance is needed for when the white objects in a shot do not look like
they do in person, to do this you have to get something pure white and zoom in
on it so the whole shot is taken up by something white, you then press the
white balance button so that the camera can adjust to the lighting. This can be
used when filming in daylight.
This is an image I took of two of the cameras set up on the tripods with the background we were working with.
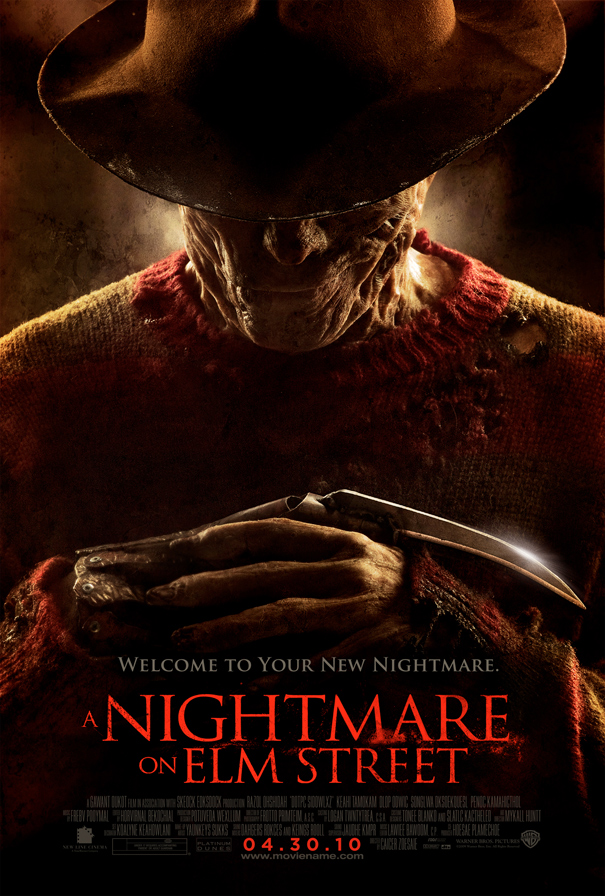
From the first glance at this poster it is
obvious this movie is a horror. From the dark red tones to the tip of the blade
for a finger glaring in the light. The entirety of the page is taken up by one malevolent
figure, despite only being able to see his hands, shoulders and half of his
face, this does not make the figure any less disturbing. In fact, you could say
the sense of mystery portrayed from only being able to see half of his face
adds to the overall frightening feel of the image. The reason this figure takes
up the whole page is to intimidate the audience and make them feel uncomfortable
as they are forced to stare at this one image, because it is the only thing
they can build ideas about the movie upon.
The figure at the front is recognisably the
villain in the movie and as the audience you are supposed to fear him. Even
just from the image he comes across as particularly frightening especially due
to the significant burn marks across his face and hands, his jumper also
appears to have been melted and burnt holes in. The lumps and chunks missing
from the figure’s face trigger ideas that he has been in some sort of accident
or a very aggressive fight, however he is still alive after whatever happened
to him which almost gives the figure a sense of immortality, adding to the
chilling feel this character gives off.
The hat in the picture is used to add mystery and
suspense to the character, it gives the impression he is almost trying to
conceal himself among normal people so he doesn’t come across as different or
stand out. He is planning to be hidden in crowds so he can go unnoticed. This
reinstates the idea of him being creepy and fearsome. The overall tone of the
poster is very dark and gloomy almost difficult to see some things which I
believe is done purposefully in order to keep the audience guessing and
interested so they don’t give too much away. This dark and gloomy setting
conforms to the conventional elements of a horror movie, as do the abnormal
burn marks and the blade for a finger.
The lighting is placed tactfully to add to the
suspense of the poster. For example there is light shining from behind him down
on his shoulders and the back of his neck, it looks almost like steam coming
off from the back of his neck which also creates a sense of burning and pain
and ties in well with the burn marks across the figure’s cheeks. Also, the
light that reflects off the blade is there to make the blade stick out and be prominent
within the image, despite all the other aspects there are to focus on.
The slogan written above the title, “Welcome to
your new nightmare.” Is brilliant for making the audience feel creeped out and
anxious for what’s to come. This removes any doubts you might have of this
movie being anything but horror as the slogan is obviously put there with the
intention to make the audience feel uncomfortable. The way it is welcoming you
into a nightmare makes the audience feel as if they are unable to escape this
nightmare and just by reading the poster they have been forced into it. The
font used for this slogan and the title also creates a rather spine-chilling
image and adds to the overall effect the poster is trying to depict.
The target audience for A Nightmare on Elm Street
is definitely those who love to feel the tension and suspense in certain scenes
as well as the action and drama that is involved once that tensional atmosphere
has been shattered. This movie is obviously not aimed for young children and
their families, it is a much more mature movie and is not appropriate for
children as it is supposed to scare adults so the effect it would have on
children would be vast in comparison.
How Tension is Built Throughout The Thriller Clip:
Blitz
In the short clip, Blitz, tension is built throughout the duration of the opening sequence. At the beginning we are shown all around the room to give the audience the idea of what setting and time period the opening sequence is set in.
It quickly becomes obvious, due to
the propaganda posters presented on the walls, that this is set during the time
of WW1 and that the girl we see at the beginning is in a bunker underground. We
can see this due to the way the camera pans down at the beginning to show a
large pipe and ground above the small room in which the movie is set.
As the camera travels around the room the title sequence is shown so
that the audience can pick up small details about the setting as well as take
note of who was responsible for this opening sequence. When being shown around
the room at the beginning there are frequent photos of a man which at first you think nothing of but as the photos become more obvious, the man becomes more
mysterious. These photographs also create tension for the audience due
to the amount of mystery that has been built up quite subtly behind the
character that is this man.
Another way
tension is created through the Winston Churchill speech which is playing
throughout the video of the details of the room. This speech is put in the video
to help set the scene so the audience is aware of the time period but it also
has a certain eeriness about it as it has connotations of war and after seeing
the little girl in the very beginning, you begin to wonder if she is completely
safe in this bunker. There is also air raid sirens and bomb sound effects which
add to the tension and general feeling of war in the video.
Suspense and tension
are especially built in the video when the door swings open and you can see the
silhouette of a man wearing a hat projected on the wall. Just the sound of the
door squeaking adds a huge amount to the overall frightening feel as in most
thriller movies there is some sort of squeaking furniture due to this sound making
the audience feel uncomfortable. Also, because it is in a lot of thriller movies
the audience are more likely to relate this kind of creepy noise to something
bad happening not too long afterwards, in other words this squeaking noise has
connotations of something bad happening afterwards. The gasp that comes from
the girl also helps to create a suspenseful and scary tone for the video and also
has the same effect on the audience of feeling uncomfortable.
When the video
changes to 60 years later there is an overall sensation of mystery in the
video, questions ranging from wondering what ever happened to the girl at the beginning
to what is that noise in the distance. A man then breaks in to the bunker and
more mystery unveils as we have no idea who or why this man is in the bunker.
While this man travels around the room the audience becomes rather
disorientated. Firstly from the change in time period and the unanswered
questions but also from the darkness and gloom in the room, and the short shots
that are taken so that you can only focus on certain areas (the ones the torch is shining on) meaning you can’t
see the entire room like you may wish to.
The moment in the opening sequence where there is the
most suspense is definitely when the torch is shone in the distance slightly
and the audience see footsteps scurry past. This causes excitement and
confusion for the audience, enticing them to watch more of the video. The audience
then become fearful for what is going to happen to the man that broke into the
bunker, they also begin to guess who the footsteps belong to, these unanswered
questions are what keeps the audience interested. This is when the camera
switches to the ghost of the girl wearing a gas mask which may cause some
audiences to jump as it is sudden and shocking.This image is particularly
frightening and now, in contrast to what you felt for the girl at the beginning
(pity, sympathetic) you now feel afraid of her and pity the man that is in the
bunker alone with her.
At the very end of the video there is the sound of a
young girl laughing which, in a normal situation, would be a happy sound, but
in this situation it sounds sadistic and malevolent.
The Quentin Tarantino film Kill Bill Vol.1 is a violent film and that is obvious even from the title of the movie. The very first thing you see is a quote that says “Revenge is best served cold” – Old Klingon Proverb. This quote reinstates the idea of the movie being violent. Immediately after the quote disappears you hear the sound of a woman breathing quite heavily and you notice that her voice is shaking viciously. This causes confusion for the audience as the screen is black at this point so the only thing you can build ideas on is the sound of her breath. The first image you see is of Uma Thurman in a wedding dress, bleeding and crying on the floor. This image is in black and white and usually the use of black and white in a primarily colour movie is signify a time in the past, to show that it is a flashback of some sort. All of these aspects put together help the audience to come to the conclusion that this movie is on the thriller scale to some extent.
The second image you see is of Bill’s heeled boots walking
across a wooden floor. This is when The Bride’s breathing becomes less
noticeable and the main focus is on the sound of Bill’s boots moving slowly
across the floor. This creates a sense of fear or menace for the audience which
also helps add suspense to the scene. This moment is particularly important in
order to show the vulnerability of The Bride in comparison to the confidence of
Bill. There is a creek as Bill walks which also helps to make Bill seem rather
sinister and threatening. The dark clothes Bill is wearing also helps the
reader to put into perspective what kind of role Bill is going to have in this
movie, especially when put into comparison with The Bride’s clothes- all white.
The image is then turned back to one much like the original
image of The Bride, except now you can hear Bill’s steps coming up closer and
closer to The Bride and the you notice Bill’s boot come up close to her face,
which again shows how threatening and powerful Bill is. Bill then asks The
Bride in a very calm, collected voice “Do you find me sadistic?” The Bride does
not have a reply other than her uncontrollable panting. Bill then pulls out a handkerchief and wipes some of the blood from The Bride’s face. This handkerchief is engraved with his own name. This allows the audience to put a name to a
voice and it also suggests that he is vain and a little arrogant,which helps
the audience to create their own personal views on the character of Bill and be
able to interpret him in their own ways. Another feature that adds to the image
of him being vain is Bill’s bracelet which gives the impression he is
narcissistic.
Bill then says,while wiping The Bride’s face with his handkerchief “You know, I bet I could fry an egg on your head right
now, if I wanted to.” This is to show how calm Bill is in comparison to The
Bride. The fact that she is in so much pain and is obviously very unstable
right now doesn’t have any affect on Bill whatsoever. This also shows how much
control he has over her in this situation, hence why he comes across so calm.
He then goes on to say “You know, Kiddo. I’d like to believe you’re aware
enough, even now, to know that there is nothing sadistic in my actions. Well,
maybe to those other jokers. But not you.” At this point the sound of Bill’s
voice overpowers the sound of The Bride’s weeping which also displays a level
of control and the fact that The Bride does not say anything gives the impression she does not want
to provoke Bill as she is afraid of what he might do to her. Bill then removes
the handkerchief and appears to stand up while saying “No, Kiddo. At this
moment…” This is when Bill pauses and you can hear the faint noise of bullets
rattling in the background. The Bride’s face changes as she realises what is
about to happen and a certain terror enters her eyes. This guides the audience
in the right direction when predicting what is going to happen next. While Bill
seems to be setting up a gun of some
sort, he says “This is me.. At my most masochistic.”
This is when the rattling of the bullets stops and The Bride finally
replies as she realises this is her last time to speak and she has nothing left
to lose. The Bride says “Bill… It’s your baby.”Just as she finishes her
sentence the gunshot goes off and it goes to the title sequence. This is a very
dramatic ending as it tells the audience that The Bride and Bill have a past
together and that she is in fact pregnant. You watch The Bride get shot in the
head and see the black blood splatter next to her head on the light side of the
screen. It is relatively generic for a thriller movie to show an amount of
blood and Tarantino stuck to this idea when showing this shocking image of the
bride. The blood has connotations of death and pain which is a large part of
thriller movies.
In conclusion,
this opening sequence is very dramatic and does not fail to intrigue the
audience in order for them to keep watching the movie. It leaves mystery behind
the character of Bill, and behind the character of The Bride whose name we
still don’t know. After this shocking image it cuts to the title sequence while
still having the bang of the gunshot fading in the background as the song “Bang
Bang” by Nancy Sinatra plays. This lyrics of the song fit well with the previous
scene as it says “my baby shot me down” referring to when Bill shot The Bride.
It then says “He wore black and I wore white” reffering to Bill wearing black
and The Bride in all white (from what the audience can see).